Embarking on a kitchen remodel is one of the most exciting and impactful home improvement projects you can undertake. Central to this transformation are the kitchen cabinets – they define the style, dictate the layout, and provide essential storage, forming the backbone of your kitchen’s functionality and aesthetic appeal. However, navigating the world of cabinetry can be surprisingly complex. From understanding different construction types and materials to deciding between stock, semi-custom, or fully custom options, the choices can seem overwhelming. This guide is designed to demystify the process, providing you with expert insights and practical advice on everything related to kitchen cabinets. We’ll delve into the crucial aspects of kitchen cabinet selection, explore the nuances of the cabinet installation process, compare custom vs stock cabinets, examine popular kitchen cabinet materials, and touch upon current cabinet design trends. Whether you’re a seasoned renovator or a first-time homeowner planning your dream kitchen in the USA, this comprehensive guide will equip you with the knowledge needed to make informed decisions, ensuring your new cabinets are not just beautiful but also perfectly suited to your lifestyle and budget for years to come. Let’s move beyond the simple box and explore the intricate world of kitchen cabinetry together.
Decoding Cabinet Construction and Quality: What Lies Beneath the Surface?
When shopping for kitchen cabinets, it’s easy to become enamored with door types and finishes. However, the true lifetime, durability, and functionality of your cabinets are determined by their structure and the grade of materials utilized within the box. Understanding these fundamental differences is critical for making a sound investment that can survive the daily rigors of kitchen life. Let’s look at the fundamental components of cabinet construction.
First, consider the cabinet box. This is the structural core of the unit. Particleboard, Medium Density Fiberboard (MDF), and plywood are the most common materials used. Particleboard is the most cost-effective choice, consisting of wood particles bound with resin. While innovations have increased its quality, it is often less robust, more prone to moisture damage, and drooping over time, particularly under the weight of heavy dishes or countertop materials such as granite or quartz. MDF is an engineered wood product created by breaking down hardwood or softwood residuals into wood fibers, mixing them with wax and a resin binder, and creating panels under high temperatures and pressure. MDF is denser and more sturdy than particleboard, resulting in a flat surface suitable for painting. It resists warping and splitting better than solid wood in regular conditions, but it can swell greatly when exposed to moisture and is heavy. Plywood, which is made up of thin layers (plies) of wood veneer glued together with adjacent layers having their wood grain rotated up to 90 degrees to one another, is often regarded as the premium material for cabinet boxes. This cross-graining makes plywood dimensionally stable, sturdy, moisture resistant (particularly marine-grade plywood), and has great screw-holding capabilities, which is essential for secure hardware and shelf installation. While more expensive, plywood construction typically indicates superior overall cabinet quality. When examining cabinets, inquire about the box material thickness (usually ½-inch or ¾-inch, with thicker being better) and how the panels are linked (dowels, glue, staples, screws, or ideally, a combination of dovetail connections for drawers).
Next, look at the drawer box construction, which is subjected to a lot of daily wear and tear. Lower-end cabinets may employ stapled particleboard or MDF for drawer boxes. Mid-range models frequently include solid wood sides linked using durable techniques such as dovetail joints (interlocking V-shaped pins and tails) or dowel joints. Dovetail joints are the gold standard, offering unparalleled strength and durability. Look for solid wood drawer bottoms, preferably with grooves on all four sides of the drawer box, as opposed to thin hardboard bottoms stapled or glued underneath, which can warp or separate over time. The drawer slides are similarly important for functionality. Undermount glides are frequently favored over side-mount glides because they are hidden, have a higher weight capability, and operate more smoothly. Look for full-extension glides that allow the drawer to be entirely pulled out for easy access to the contents, as well as soft-close mechanisms that avoid slamming and reduce wear and tear. The quality of these processes has a considerable impact on the user experience.
Shelving is another significant consideration. Are the shelves constructed from the same durable material as the cabinet box (plywood or solid MDF)? Are they adjustable to accommodate things of different heights? Check shelf thickness: shelves less than ¾-inch thick, especially particleboard, might sag over time, especially on larger cabinets. Look for metal or high-impact plastic shelf clamps that lock firmly in place.
The cabinet back panel also affects structural integrity. The tiny, fragile hardboard back provides little support. Fitting a solid, full-back panel (preferably ¼-inch or thicker plywood or MDF) into slots in the sides, top, and bottom panels improves cabinet strength and keeps it square during installation, eliminating racking.
Finally, analyze the joinery techniques employed throughout the cabinet. Dado joints (a groove cut across the grain to receive another piece), rabbet joints (a step-shaped recess cut along the edge), and mortise-and-tenon joints (a projecting tenon fits into a corresponding mortise hole) are examples of better craftsmanship and structural integrity than simple butt joints held only by screws or staples. While these features may appear insignificant, they add to the cabinet’s overall strength, stability, and longevity. Investing in better construction upfront frequently results in fewer problems and higher pleasure down the line, so understanding these technical characteristics is an important component of your kitchen cabinet purchase. Don’t be afraid to ask the showroom personnel comprehensive questions regarding construction procedures and materials; a good supplier will be open about what goes into their products. Remember that quality construction serves as the foundation for your gorgeous kitchen.
Navigating Your Options: Stock, Semi-Custom, and Custom Cabinets Explained
One of the most important decisions in the kitchen cabinet selection process is determining which type of cabinets best meets your needs, budget, and design vision: stock, semi-custom, or totally bespoke. Each category has unique benefits and drawbacks in terms of cost, customization choices, lead times, and quality. Understanding these variations is critical for matching your expectations to the actual output.
Stock cabinets are the most economical and widely available alternative. Stock cabinets are mass-produced to standard sizes, styles, and finishes. They are commonly constructed in 3-inch width increments (e.g., 12″, 15″, 18″, 21″, etc.), as well as standard height and depth. Because they are produced in big quantities and frequently kept in inventory by manufacturers or large merchants, lead times are typically the lowest, with items accessible within days or a few weeks. The primary advantage of stock cabinets is their affordability. However, this has limitations. Customization possibilities are limited; you’re typically confined to the manufacturer’s preset selection of door types, wood species (sometimes limited to popular selections such as oak, maple, or thermofoil), finishes, and hardware. Achieving a precise fit in non-standard kitchen layouts can be difficult, frequently necessitating the use of filler strips to bridge gaps between cabinets and walls or appliances, which can detract from a high-end appearance. While the quality of stock cabinets has improved over time, they frequently use lower-cost materials such as particleboard for box construction and may have less durable hardware than higher-tier options. Stock cabinets are a good option for budget-conscious restorations, rental homes, or instances where speed is critical, but they may not please homeowners who want distinctive designs or specialized features.
Semi-custom Cabinets: Semi-custom cabinets fall somewhere in the center, offering a compromise between the affordability of stock and the versatility of bespoke. They begin with typical cabinet sizes but offer a greater variety of customization choices. You’ll usually discover a wider range of door types, finishes, wood species (kitchen cabinet materials), and decorative components. More importantly, semi-custom lines frequently allow for dimensional modifications, such as increasing or decreasing cabinet depth or width in smaller increments (e.g., 1-inch), providing greater design flexibility to better suit your unique kitchen plan. You may also find specialty storage solutions, such as pull-out spice racks, drawer organizers, or integrated garbage bins, that are not conventional in stock lines. Semi-custom cabinets are often higher quality than stock cabinets, with options for plywood box structure, solid wood dovetail drawers, and enhanced hardware such as soft-close hinges and glides. Lead times are longer than stock, often ranging from 4 to 8 weeks, because cabinets are frequently built-to-order depending on your specifications. The cost is more than stock but far lower than entirely custom. Semi-custom cabinets are a popular choice among homeowners because they offer a fair balance of individuality, quality, and value, allowing for a more individualized look without the high cost of full custom construction. This category efficiently bridges the gap between custom and stock cabinets for many projects.
bespoke Cabinets: As the name implies, bespoke cabinets provide almost endless options. They are completely custom-designed and produced to your exact specifications, including size, shape, style, material, finish, and features. This is the best option if you have an unusually shaped kitchen, special functional requirements, or a distinct design concept that cannot be met with conventional or semi-custom solutions. Do you want cabinets that reach the ceiling precisely? Need a certain width to precisely flank a professional range? Do you want a unique wood species or a custom paint hue that matches your favorite swatch? Custom cabinetry makes this possible. The cabinet maker collaborates closely with you or your designer to develop genuinely unique items. Construction quality is often the best, with premium kitchen cabinet materials such as solid hardwoods and furniture-grade plywood, precise gluing processes, and high-quality hardware. You have complete control over every aspect, including elaborate moldings and unique interior fittings. However, this level of customisation and workmanship is the most expensive and demands the longest lead times, which can range from 8 to 16 weeks or more, depending on the complexity and cabinet maker’s schedule. Custom cabinet installation necessitates the use of competent installers who have prior experience with unique projects. Custom cabinets are an expenditure that is best suited for high-end renovations where money is not an issue and the primary goal is to create a really unique, flawlessly fitted kitchen.
When deciding between stock, semi-custom, and custom options, you must carefully consider your budget, desired amount of personalization, project duration, and quality and durability requirements. Evaluating these criteria early in the kitchen renovation planning process can help you make an informed decision about kitchen cabinets.
Material World: A Deep Dive into Popular Kitchen Cabinet Materials
The material you choose for your kitchen cabinets significantly impacts their appearance, durability, maintenance requirements, and cost. While the cabinet box construction (discussed in Section 1) is crucial for structure, the doors and drawer fronts are what define the visual style. Understanding the characteristics of various kitchen cabinet materials is fundamental to making an informed kitchen cabinet selection.
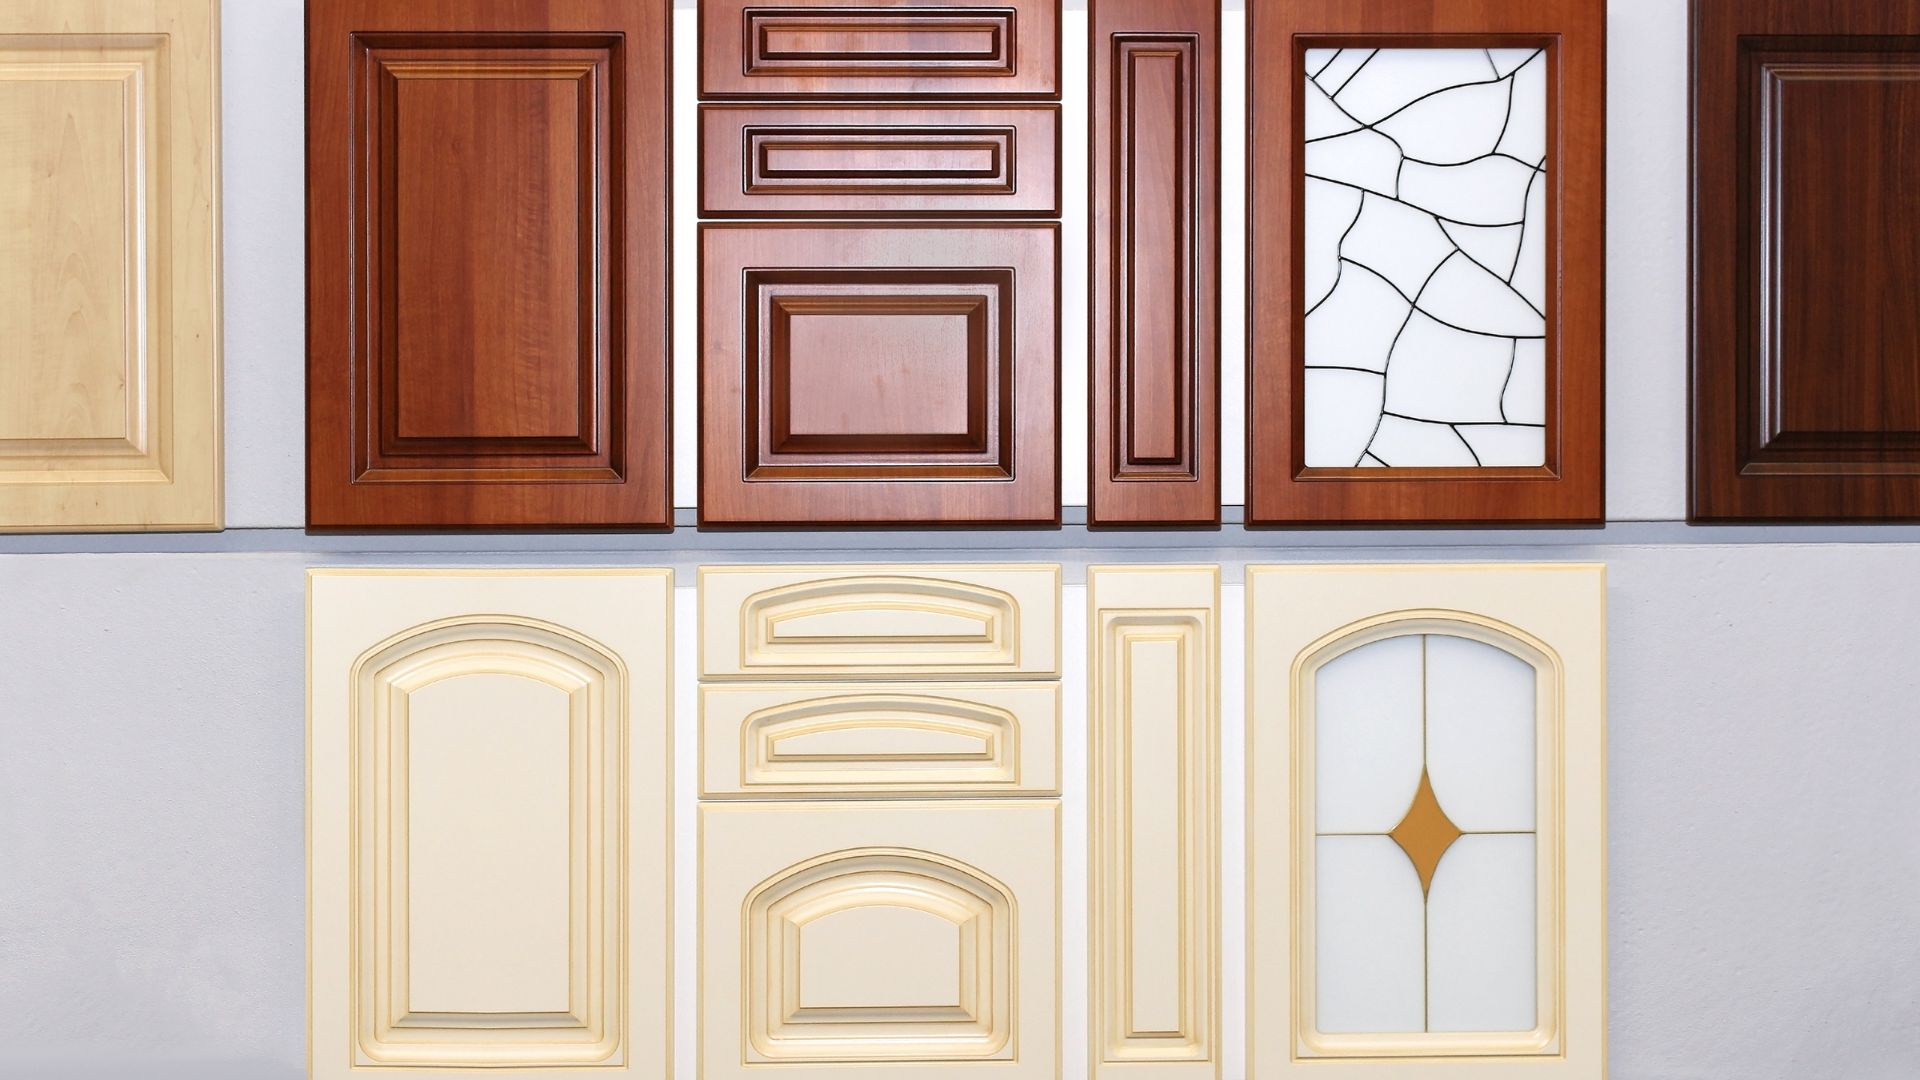
Solid Wood: A timeless and popular choice, solid wood cabinets offer natural beauty, warmth, and durability. Common wood species used in the USA include:
- Oak: Known for its prominent grain pattern (either linear in quarter-sawn or swirling in plain-sawn) and durability. Red oak has pinkish undertones, while white oak is more grey/brown. It stains well but the heavy grain texture can show through paint.
- Maple: A hardwood with a fine, subtle grain pattern, providing a smooth surface ideal for painted or stained finishes. It’s strong, durable, and typically more expensive than oak.
- Cherry: Prized for its rich color (ranging from light pinkish-brown to reddish-brown) that darkens beautifully with age and exposure to light. It has a smooth, fine grain. Cherry is a premium hardwood and comes with a higher price tag.
- Hickory: Known for its dramatic color variations (from creamy white to dark brown within the same plank) and prominent grain pattern. It’s very hard and durable but the rustic look might not suit all styles.
- Birch: Similar in appearance and hardness to maple but often slightly less expensive. It has a fine grain and takes finishes well.
- Alder: A softer hardwood with a fine, straight grain similar to cherry but lighter in color and more budget-friendly. It’s less resistant to dents than harder woods.
- Pine: A softwood known for its knotty, rustic appearance. It’s less expensive but also less durable and more prone to scratches and dents. Often used for farmhouse or country styles.
Solid wood can expand and contract with changes in humidity and temperature, which can potentially lead to minor warping or cracking over time, especially on wider panels like doors. This natural movement is normal but something to be aware of.
Plywood: While primarily used for cabinet boxes, higher grades of plywood with attractive wood veneers (like maple, cherry, or oak) can sometimes be used for flat-panel cabinet doors or end panels, especially in modern or European-style (cabinet design trends) frameless cabinetry. It offers excellent stability and resistance to warping.
Medium Density Fiberboard (MDF): As mentioned before, MDF is an engineered wood product. Its key advantage for cabinet doors is its extreme stability – it does not warp, crack, or expand/contract like solid wood. It also provides a perfectly smooth surface, making it the preferred substrate for painted finishes, as there’s no wood grain texture to show through. High-quality MDF is dense and durable, though its edges can be susceptible to damage if not properly sealed, and it’s heavier than solid wood. It’s often used for painted doors, raised panels within solid wood frames (to prevent panel cracking), or as the core for thermofoil or laminate doors.
Particleboard/Furniture Board: Generally used for cabinet boxes in lower-cost lines, particleboard can also be used as a core material for doors covered with laminate, thermofoil, or melamine. It’s the least expensive option but also the least durable and most susceptible to moisture damage. Quality varies significantly based on density and the resins used.
Thermofoil: This is not a material itself, but a finish applied over an MDF core. A flexible vinyl film (the thermofoil) is heated and vacuum-pressed onto the MDF substrate, conforming to the shape of the door, including any routed details. Thermofoil provides a smooth, seamless, and easy-to-clean surface, often in solid colors (especially white and off-whites) or sometimes wood-grain patterns. It’s a budget-friendly alternative to painted finishes. However, thermofoil can be susceptible to heat damage (causing peeling or delamination, especially near ovens or toasters) and can be difficult or impossible to repair if scratched or chipped. Quality has improved, but heat shields are often recommended near high-heat appliances.
Laminates (High-Pressure Laminate – HPL / Low-Pressure Laminate – Melamine): Similar to thermofoil, laminates are applied over a substrate, typically particleboard or MDF. HPL (like Formica or Wilsonart brands) is very durable, resistant to scratches, stains, and heat, and available in a vast array of colors and patterns. It’s often used for flat-panel, modern-style doors. Melamine (LPL) is essentially resin-saturated paper thermally fused to the substrate. It’s less durable and less expensive than HPL but still offers good scratch and moisture resistance for its cost. Both are easy to clean but can chip, and repairs can be challenging.
Metal: Stainless steel or other metal cabinets offer a sleek, modern, industrial look. They are extremely durable, hygienic, and resistant to heat and moisture. However, they can be expensive, show fingerprints and smudges easily, and may be prone to denting. Often seen in commercial kitchens or very contemporary residential designs.
Glass: Glass door inserts (clear, frosted, textured, seeded) are often used in upper cabinets to display attractive dishware or break up a long run of solid cabinetry. They add visual interest and lightness but require contents to be kept tidy. Mullions (wood grids) can add traditional or transitional style.
Choosing the right kitchen cabinet materials involves balancing aesthetics, durability, maintenance, and budget. Consider your kitchen’s style, how heavily the kitchen is used, and your tolerance for maintenance when making this critical part of your kitchen cabinet selection. Comparing custom vs stock cabinets often involves different material availability and quality levels within those categories as well.
Style & Functionality: Exploring Cabinet Design Trends and Storage Solutions
Beyond the essential choices of construction and materials, the aesthetic style and practical layout of your cabinets are critical in determining your kitchen’s overall character and usability. Staying current on cabinet design trends while maintaining timeless practicality means that your kitchen is both beautiful and functional for years to come. Effective kitchen cabinet choosing requires a seamless blend of form and function.
Popular cabinet door styles:
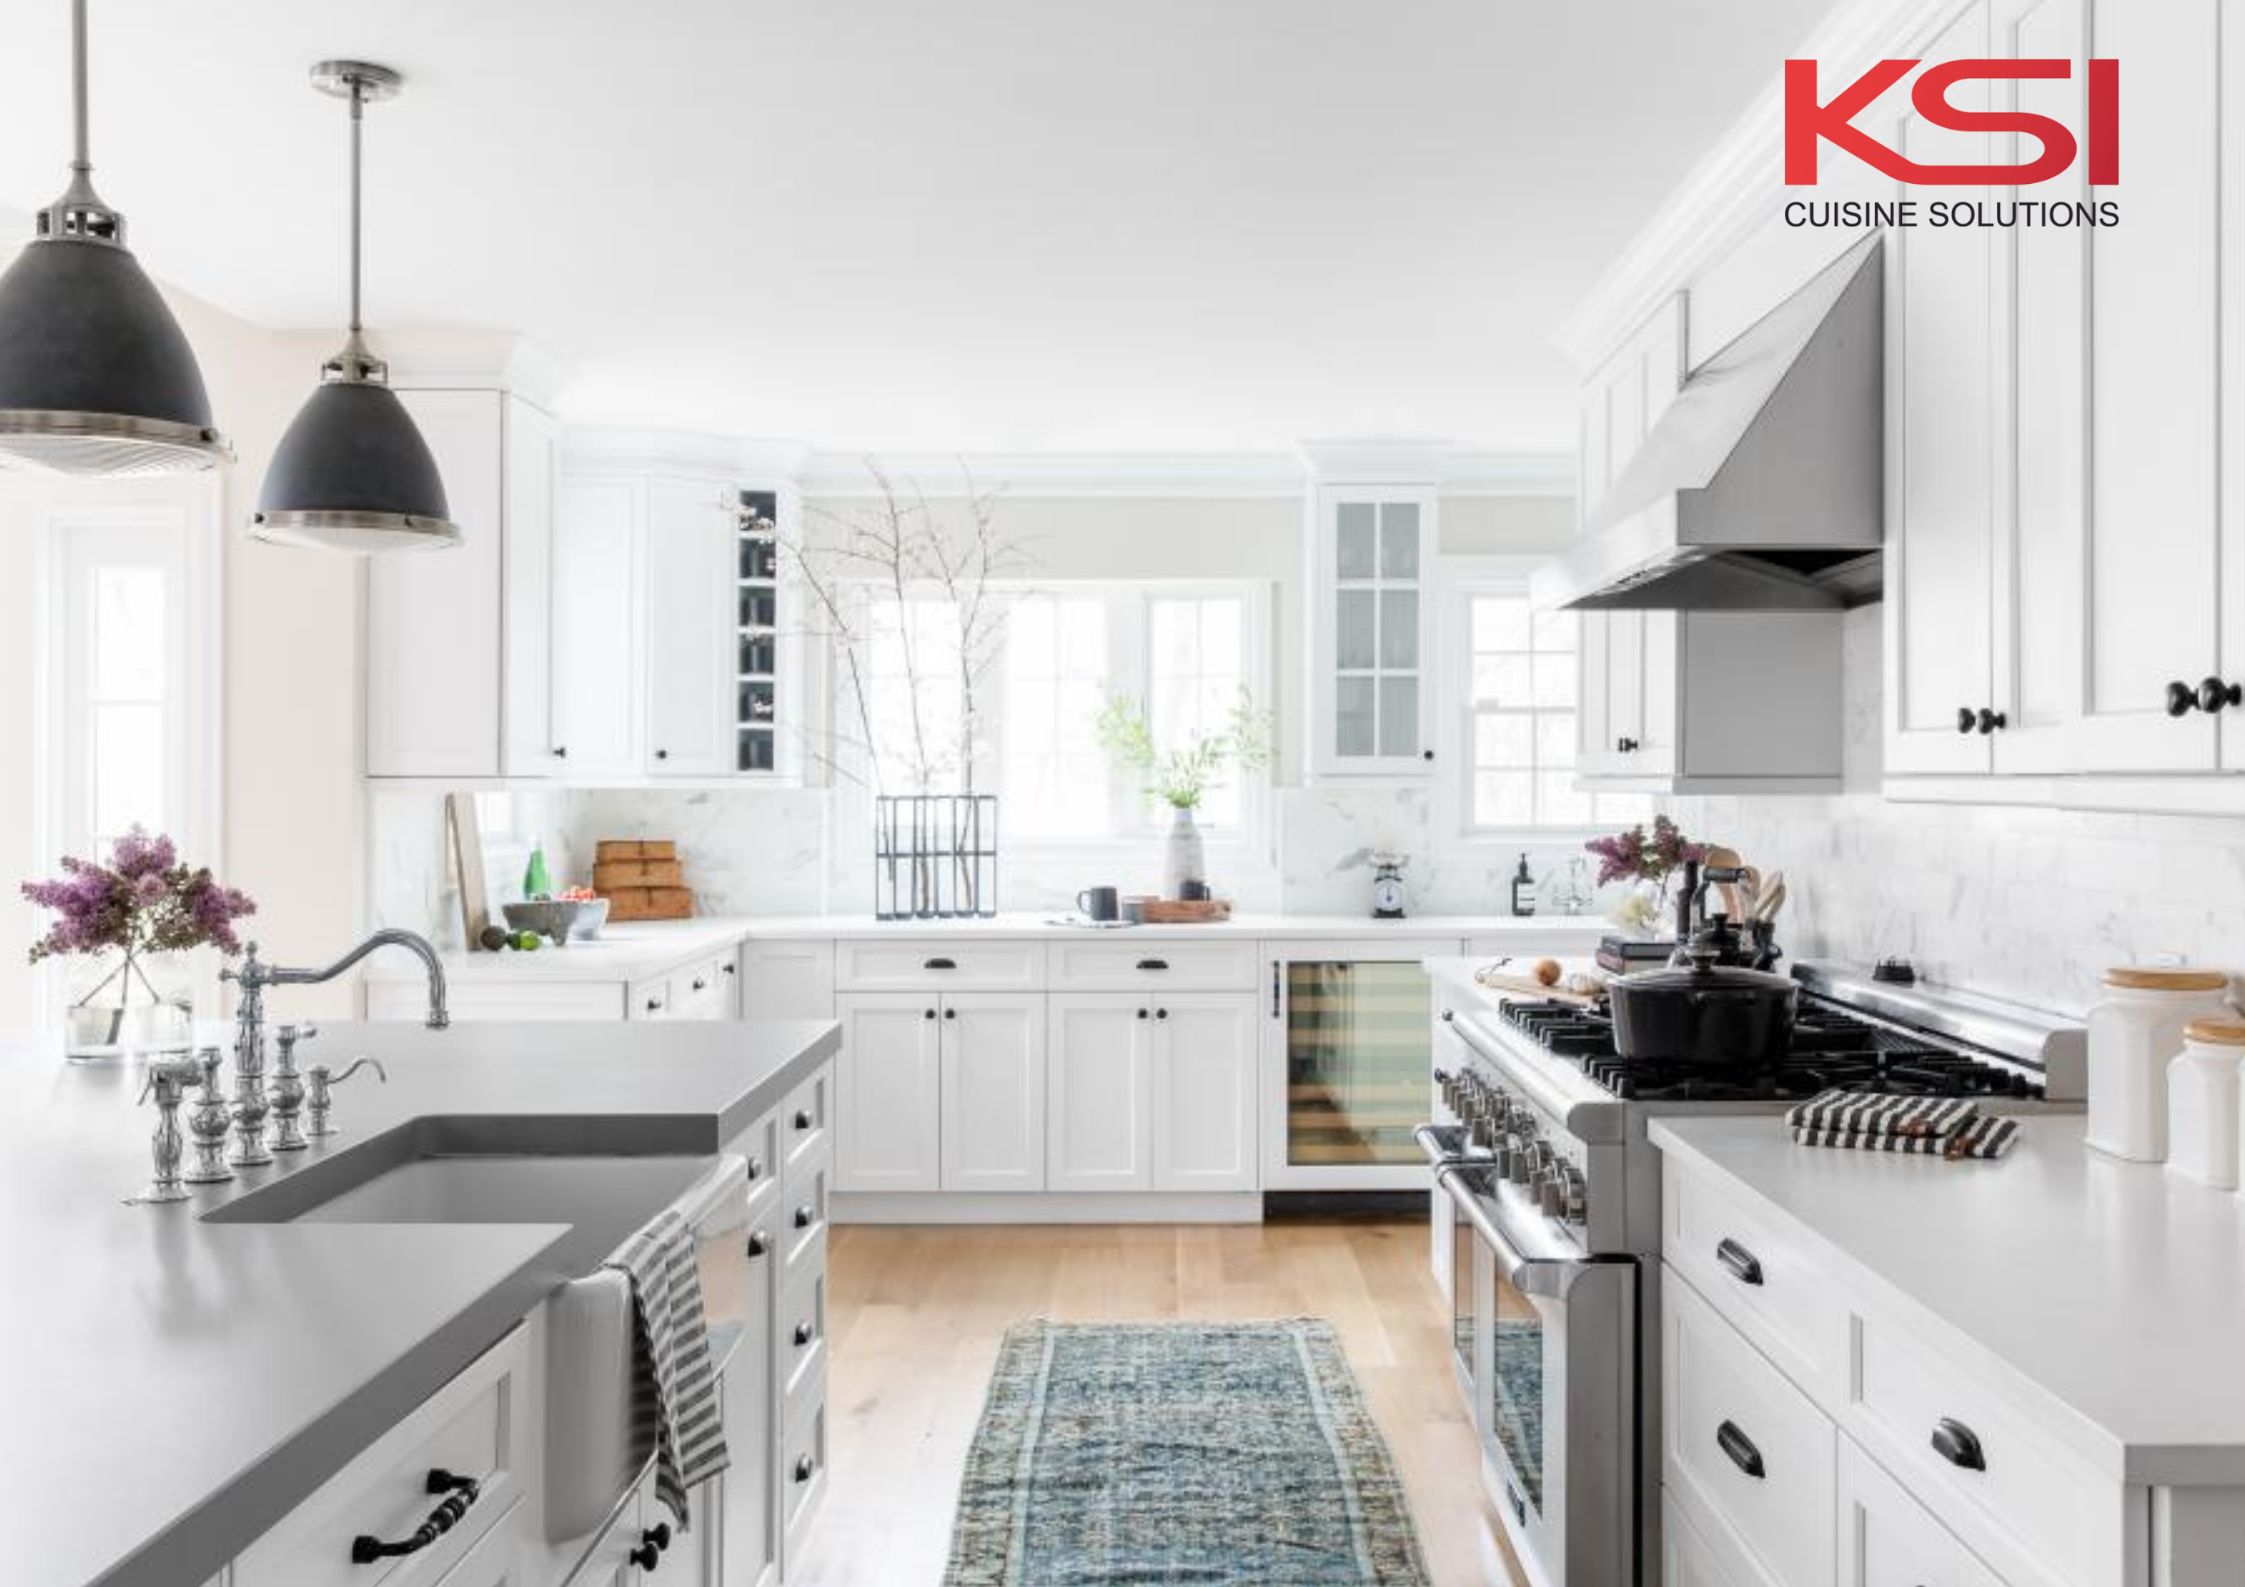
Shaker: A simple, clean design with a flat recessed center panel and square frame edges (stiles and rails). Shaker doors are quite adaptable, working well in traditional, transitional, farmhouse, and even contemporary designs depending on the finish and hardware. Their ageless appeal makes them a perennial favorite.
Flat-Panel (Slab): These doors have an entirely flat surface with no decoration. They provide a sleek, minimalist appearance that is ideal for modern and contemporary kitchens. High-gloss laminates, thermofoil, and wood veneers are common examples of this style, which emphasizes clean lines.
elevated Panel: The door’s central panel is elevated, with a profiled or curved edge. This style creates depth and dimension, making it suitable for more conventional or formal kitchen designs. Various profiles (ogee, cove, etc.) produce diverse appearances.
sunken Panel (similar to Shaker but maybe with profiled edges): Like Shaker, but the frame or edge of the sunken panel may have decorative routing or profiling, providing a little more detailed appearance than basic Shaker. Beadboard panels and panels with routed grooves are good examples.
Arched Panel: Similar to raised or recessed panel doors, but the top rail (and sometimes the bottom) is arched, giving the door a softer, more conventional, or country feel. A “cathedral arch” is a popular style.
Current cabinet design trends:
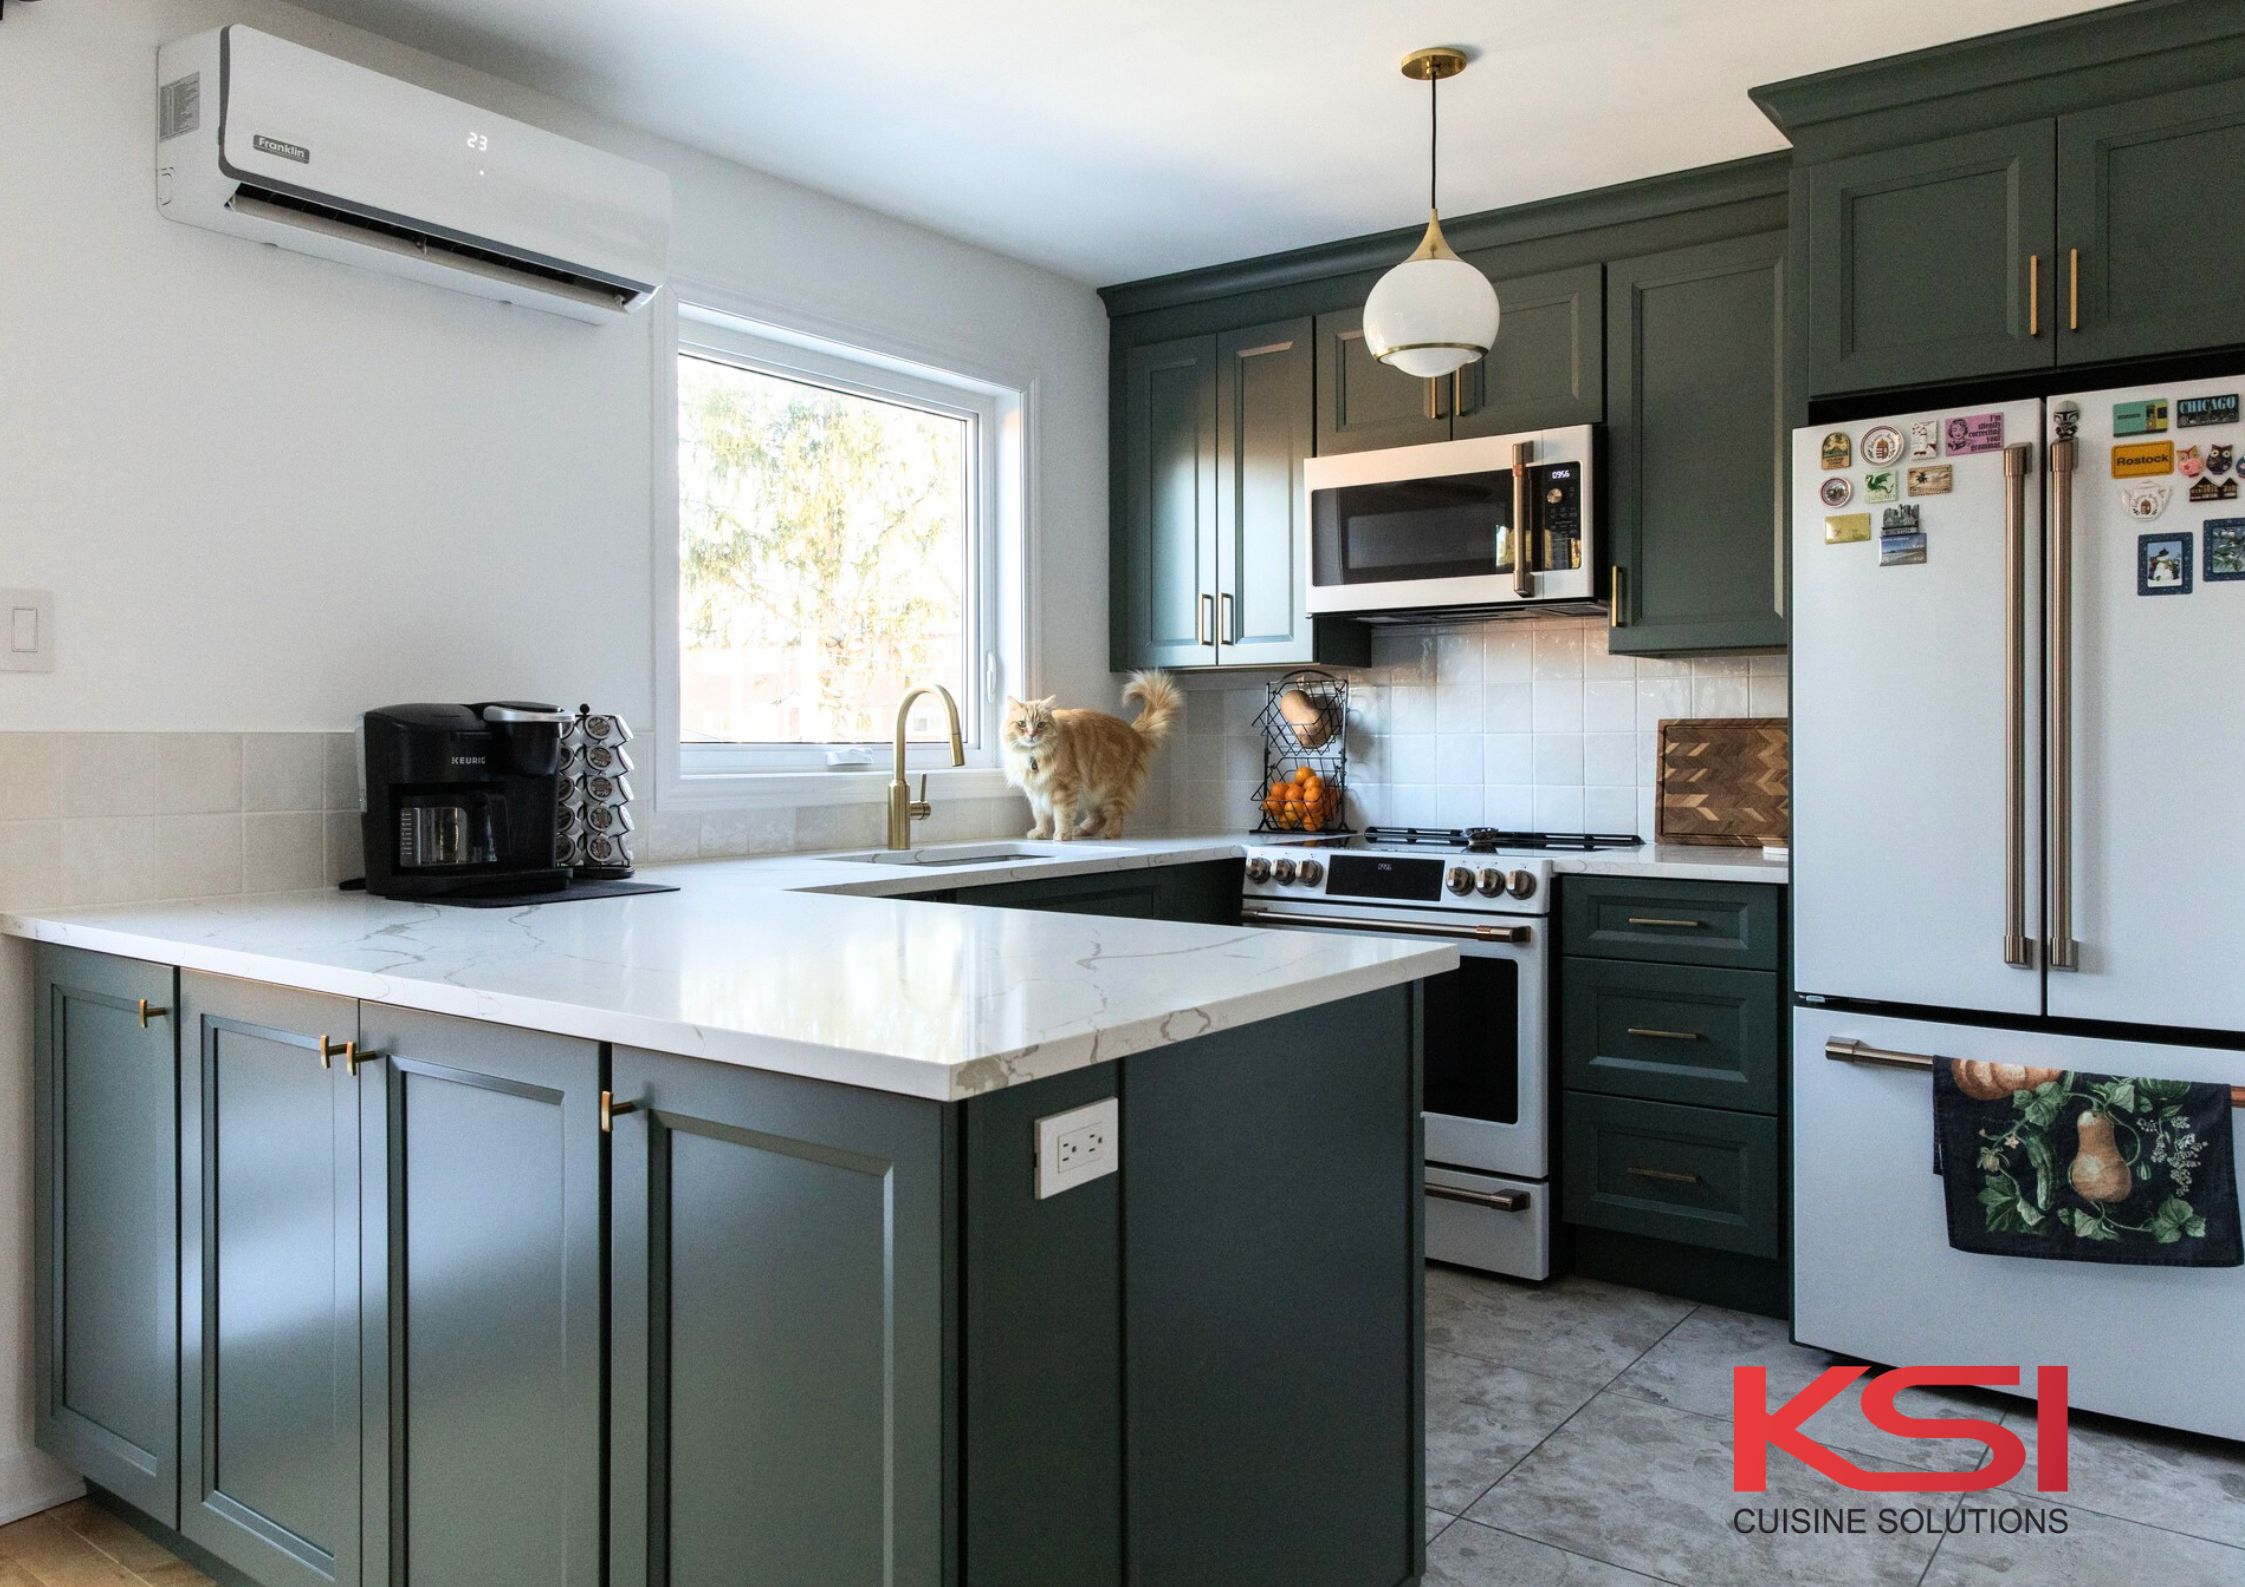
Colour palettes: While white kitchens are timeless, there is a strong trend toward adding more color. Deep blues, greens (sage, forest), and even blacks are popular for base cabinets or islands, which are typically matched with white or light wood uppers. Two-toned kitchens (with contrasting colors for the upper and lower cabinets or the island) remain popular. Warm wood tones (such as walnut or white oak) are also making a resurgence, frequently utilized to offer natural texture and warmth.
Minimalism and clean lines: Even in more conventional forms, crisper lines are becoming more common. Less ornamental ornamentation, straightforward hardware (or even handleless designs with push-to-open mechanisms or channel pulls), and integrated appliances all contribute to a less crowded appearance. This approach is well-suited to frameless (Euro-style) cabinets, which maximizes interior space while maintaining a streamlined appearance.
Mixed Materials: Using multiple materials and finishes creates visual interest and texture. Consider wood base cabinets with painted uppers, or an island with a different countertop and cabinet finish than the perimeter. Metal embellishments like range hoods and exposed storage brackets are also trendy.
Open Shelving: Strategically placed open shelving (typically in natural wood tones) breaks up cabinetry walls, offers exhibit space, and creates an airy atmosphere. However, it necessitates carefully selected things and regular dusting.
Glass Front Cabinets: As previously stated, glass inserts (clear, frosted, and reeded) remain popular for adding visual variation and display options. Integrated lighting within these cabinets adds to the appearance.
Smart Storage Solutions: Functionality is essential. Pull-out spice racks, corner cabinet solutions (Lazy Susans, blind corner pull-outs), deep drawers for pots and pans (doors are increasingly replacing base cabinets), integrated trash and recycling centers, vertical dividers for baking sheets, and custom drawer organizers are all popular trends.
Improving Functionality through Layout and Storage:
Effective cabinet arrangement involves more than simply looks. Consider workflow (traditional work triangle or contemporary zone-based design – prep zone, cooking zone, cleaning zone), accessibility, and storage requirements.
Base Cabinet Drawers: Replacing ordinary base cabinets (door and shelf) with deep, broad drawers is a significant functional improvement. Drawers provide much greater visibility and access to contents; no more squatting and searching in the back of a dark cabinet.
Tall pantry cabinets with roll-out shelves or drawers offer convenient, consolidated food storage.
Appliance Garages: Keep counters clean by installing separate cabinets with lift-up or retractable doors to accommodate small equipment such as toasters, blenders, and coffee machines.
Corner Solutions: Use specialized gear, such as Lazy Susans, rotating shelves, or blind corner pull-out systems, to make notoriously problematic corner areas functional.
Vertical Storage: Use small vertical areas next kitchen ranges or wall ovens to hang pull-out spice racks or tray dividers for cookie sheets and cutting boards.
Under-Sink Organization: Use pull-out organizers built exclusively for cleaning materials to make the most of your plumbing area.
It is critical to incorporate these functional factors into the kitchen cabinet choosing and design process. Discussing your storage requirements and how you want to utilize your kitchen with your designer or cabinet supplier will assist in tailoring the layout and features. Balancing cabinet design trends with practical, long-lasting storage solutions means that your kitchen is both elegant and enjoyable to work in, making the entire room more efficient and organized. The cabinet installation process must also account for the appropriate operation of these specialist modules.
The Installation Equation: DIY vs. Professional Cabinet Installation Process
Once you’ve navigated the complexities of kitchen cabinet selection, agonized over kitchen cabinet materials, and finalized your dream design incorporating the latest cabinet design trends, the next critical phase begins: installation. The quality of the cabinet installation process is just as important as the quality of the cabinets themselves. Improper installation can lead to misaligned doors, uneven gaps, structural instability, and potential damage to the cabinets or your home. This raises a significant question: should you attempt a DIY installation or hire professionals?
DIY Cabinet Installation:
Taking on cabinet installation yourself can seem like a tempting way to save money on your kitchen remodel budget. If you possess advanced carpentry skills, have the right tools, patience, and preferably a helping hand (cabinets, especially uppers, can be heavy and awkward), a DIY approach might be feasible.
- Pros:
- Cost Savings: The most significant advantage is avoiding labor costs, which can be substantial.
- Control: You have complete control over the pace and process (within your skill limits).
- Satisfaction: Successfully completing a complex task like cabinet installation can be very rewarding.
- Cons:
- Skill Requirement: This is not a beginner’s DIY project. It requires precision measuring, understanding how to find studs, leveling cabinets perfectly (horizontally and vertically), securely fastening them to walls and each other, and potentially scribing filler pieces to uneven walls. Mistakes can be costly and difficult to fix.
- Time Commitment: Installation is time-consuming, often taking several days even for experienced individuals. Underestimating the time required is common.
- Tool Requirements: You’ll need specific tools beyond a basic toolkit, including a quality level (4-foot or longer), stud finder, drill/driver with various bits, clamps, circular saw or jigsaw (for cutting filler strips or openings), possibly a scribe tool, shims, and appropriate fasteners.
- Risk of Damage: Mishandling heavy cabinets can lead to damage to the cabinets themselves, walls, floors, or even personal injury.
- Voided Warranties: Some cabinet manufacturers may void warranties if the cabinets are not installed by certified professionals.
- Potential for Imperfect Results: Achieving perfectly plumb, level, and aligned cabinets with consistent reveals (gaps between doors/drawers) requires expertise. Slight errors can be very noticeable and detract from the final look. Uneven installation can also cause issues with countertop installation later.
Professional Cabinet Installation:
Hiring experienced cabinet installers or a qualified general contractor offers numerous advantages, particularly for complex layouts or expensive cabinetry like custom vs stock cabinets (especially custom).
- Pros:
- Expertise & Experience: Professionals have the skills, knowledge, and experience to handle various challenges, such as uneven walls or floors, complex corner units, and ensuring structural integrity. They understand the nuances of different cabinet types and brands.
- Efficiency: Experienced installers work much faster than the average DIYer, minimizing disruption in your home.
- Proper Tools & Techniques: They have specialized tools and know the correct techniques for leveling, shimming, fastening, and scribing for a seamless, secure fit.
- Quality Results: Professional installation typically yields superior results with precise alignment, consistent reveals, and a polished finish.
- Problem Solving: They can anticipate and address potential issues during the installation that a DIYer might miss.
- Accountability & Insurance: Reputable installers are insured, protecting you from liability in case of accidents or damage. They also stand behind their work, often offering a warranty on the installation itself.
- Warranty Protection: Using certified installers often ensures your cabinet manufacturer’s warranty remains valid.
- Cons:
- Cost: Professional labor is a significant expense, adding to the overall project budget. Costs vary based on location, complexity, and the number of cabinets.
- Scheduling: You’ll need to coordinate with the installer’s schedule, which might impact your project timeline.
Making the Decision:
For most homeowners, especially those investing significantly in semi-custom or custom cabinets, hiring professionals for the cabinet installation process is the recommended route. The cost is often justified by the quality of the results, the time saved, the reduced stress, and the protection of your investment. If you are installing basic stock cabinets in a simple layout and possess strong carpentry skills and the necessary tools, DIY might be considered, but weigh the risks carefully.
Finding a Professional Installer:
If you opt for professional installation:
- Get multiple quotes.
- Check references and reviews. Look for installers with specific experience in kitchen cabinets.
- Verify they are licensed (if required in your area) and insured (liability and worker’s compensation).
- Get a detailed written contract outlining the scope of work, timeline, and cost.
- If you purchased cabinets through a full-service kitchen design firm (like the example analyzed earlier), they often provide or coordinate professional installation, simplifying the process.
Ultimately, a flawless cabinet installation process ensures your carefully selected cabinets look and function as intended, becoming the beautiful, enduring centerpiece of your kitchen.
Maintaining Your Investment: Cabinet Care, Adjustments, and Longevity Tips
Your beautiful new kitchen cabinets are installed, the countertops are gleaming, and your renovation dream is finally a reality. However, the journey doesn’t end there. Proper care and maintenance are essential to keep your cabinets looking and functioning their best for years to come, protecting your significant investment. Understanding routine cleaning, addressing minor issues, and knowing how to perform simple adjustments can significantly extend the life and beauty of your cabinetry, regardless of whether you chose economical stock options or high-end custom pieces resulting from your kitchen cabinet selection.
Routine Cleaning:
Regular, gentle cleaning is the cornerstone of cabinet care. The frequency depends on how heavily your kitchen is used, but a general guideline is to wipe down exterior surfaces weekly and address spills immediately.
- Recommended Cleaning Solution: Use a soft, lint-free cloth (microfiber is ideal) dampened with mild dish soap and warm water. Wring the cloth out well – excessive moisture is the enemy of most kitchen cabinet materials, especially wood and MDF. Wipe the surfaces gently, following the grain direction if applicable (for wood or wood-look finishes).
- Rinsing and Drying: After wiping with the soapy solution, use a separate clean, damp cloth to rinse away any soap residue. Immediately follow up by drying the surface thoroughly with another soft, dry cloth. Never allow water or cleaning solutions to sit on cabinet surfaces or seep into joints or edges.
- Dealing with Grease and Grime: Kitchen cabinets, especially those near the cooktop, inevitably accumulate grease. For tougher grime, you might need a slightly stronger solution. A 50/50 mix of distilled white vinegar and warm water can be effective. Alternatively, use a commercial wood cabinet cleaner specifically designed for kitchen environments – always test in an inconspicuous area first and follow the manufacturer’s instructions. Avoid harsh chemicals, abrasive cleaners (like scouring powders or steel wool), ammonia-based cleaners, or solvent-based cleaners (like acetone), as these can damage the finish.
- Interior Cleaning: Periodically (perhaps seasonally), empty your cabinets and drawers. Wipe down the interior surfaces using the same mild soap and water method. Ensure interiors are completely dry before replacing contents. This is also a good time to check for any signs of pests or moisture issues.
- Glass Doors: Clean glass inserts with a standard glass cleaner, spraying it onto the cloth rather than directly onto the glass to prevent the cleaner from seeping into the wood or frame joints.
Hardware Care:
Wipe cabinet knobs and pulls regularly with a soft, damp cloth and dry thoroughly. Avoid harsh chemicals that could damage the hardware finish. Periodically check if knobs or pulls have become loose and tighten the screws from the inside of the door or drawer.
Minor Adjustments:
Over time and with regular use, cabinet doors and drawers may require minor adjustments to maintain proper alignment and function. This is a normal part of the cabinet installation process settling and ongoing use.
- Door Hinge Adjustments: Most modern cabinet hinges (especially European concealed hinges) allow for three-way adjustment: side-to-side, up-and-down, and in-and-out. Look for adjustment screws on the hinge body. Typically, one screw adjusts horizontal alignment (closing gaps or centering the door), another adjusts vertical alignment (raising or lowering the door), and a third adjusts the door’s depth relative to the cabinet face. Consult your cabinet manufacturer’s documentation or look up the specific hinge type online for detailed instructions. Small, incremental turns are usually all that’s needed.
- Drawer Glide Adjustments: Some drawer glides also have adjustment mechanisms, often located on the glide itself or where it attaches to the drawer box, allowing for minor vertical or horizontal positioning changes. Soft-close features may also have tension adjustments. Refer to the hardware documentation.
- Addressing Sticking Drawers/Doors: Humidity changes can cause wood to swell slightly, potentially causing minor sticking. Ensure the area is clean first. If sticking persists, check alignment. Avoid forcing doors or drawers. Sometimes applying a bit of wax (like paraffin or beeswax) to contact points on wood drawers can help.
Protecting Your Cabinets:
- Heat Protection: Avoid placing heat-generating appliances (toasters, coffee makers) directly beneath upper cabinets, especially those with thermofoil finishes, as prolonged heat exposure can cause damage or discoloration. Use heat shields between cabinets and appliances like ovens or dishwashers if recommended by the cabinet manufacturer.
- Moisture Control: Wipe up spills immediately, especially around the sink area. Ensure your kitchen has adequate ventilation (use the range hood when cooking) to minimize humidity buildup, which can affect wood and MDF cabinets. Fix leaky faucets or pipes promptly.
- Sunlight Exposure: Prolonged direct sunlight can cause fading or discoloration, particularly on stained wood finishes. Consider window treatments (blinds, UV-protective film) if cabinets receive intense daily sun exposure.
- Avoiding Physical Damage: Be mindful of bumping cabinets with chairs, vacuum cleaners, or heavy objects. Use caution when placing or removing items to avoid scratching interior surfaces. Consider using shelf liners to protect shelves and drawer bottoms.
By incorporating these simple care and maintenance practices into your routine, you can ensure your kitchen cabinets, a major component resulting from careful kitchen cabinet selection and potentially comparing custom vs stock cabinets, continue to enhance your home’s beauty and functionality for many years. Regular attention prevents minor issues from becoming major problems and keeps your kitchen looking its best.
Choosing, designing, and installing kitchen cabinets is a major endeavor that serves as the foundation of any kitchen renovation. As we’ve seen throughout this book, success is dependent on understanding the finer aspects, from the concealed quality of cabinet construction to the broad selection of kitchen cabinet materials to the critical decision between stock, semi-custom, and custom solutions. Staying up to date on current cabinet design trends, while prioritizing timeless utility and smart storage solutions, ensures that your final kitchen cabinet pick creates a room that is both attractive and efficient. Furthermore, understanding the value of a precise cabinet installation procedure, whether DIY or professional, and committing to regular care and maintenance will protect your investment in the long run. By arming yourself with this knowledge, you can go beyond simply purchasing boxes and curate the important aspects that will define your kitchen’s character, utility, and long-term worth. Plan ahead of time, make sensible decisions, and enjoy the process of transforming your dream kitchen into reality.